Like us on facebook to get more free pro tricks daily...!

Liked us?

Monday 17 December 2012

MobRedirect - Mobile Detection and Redirection Tool

1 comments
MobRedirect is a mobile detection & redirection tool kit to provide complete solutions for mobile device detection and redirection. MobRedirect supports all types mobile devices. MobRedirect is helpful to detect and redirect mobile users to mobile site. MobRedirect is a .htaccess script. It is very powerful and Robust script than any other php detection and redirection script. Sometimes in some cases PHP detection and redirection script won’t detect mobile device, but this is not happened in .htaccess script.

MobRedirect - Mobile Detection and Redirection - CodeCanyon Item for Sale 


Features :

  1. Detect almost all mobile devices and take action.
  2. Redirect based on individual devices( Like Apple, Android, Windows…)
  3. Sniff out details like Screen resolution, WAP support, Js Support etc.
  4. It obeys all the rules set by Google for Mobile devices.
  5. Back to desktop version support.
  6. Add your own device list.
  7. Well documented.
  8. Easy installation.
  9. And many More…
To get this  MobRedirect - Mobile Detection and Redirection Script click below link....


Read more >>

Saturday 10 November 2012

Top 10 HTACCESS Scripts

0 comments
For those of you getting into the “nuts and bolts” of website design, you will find that there are times where you will need to create and/or modify the .htaccess file. In this regard, I have provided some of the most important .htaccess scripts I have come across, many which I use and have found indispensable.
If you are unfamiliar with .htaccess creation, all you need is “notepad” (not msword) since you want to ensure that there is no default character formatting. You add the code you wish into it, and then upload the file titled .htaccess to your public folder where the html files are stored (typically called public_html, or www, etc). In some cases there will be unique .htaccess files for the different folders, especially useful if you wish to block access to some folders and their files, but not all. Ok, that being said, here they are:


2. Custom Error Page
By default your browser will serve up an error page in those cases where a page link is broken, or someone manually enters a link to a page that does not exist. The best solution is to create a custom page since this will allow you to track errors (if you wish), and you now have the opportunity to brand the page creatively, have it match your existing website, … and what most will do is provide a site-map, search engine, etc. to help someone find content on your site that you know does exist. You could create the page as a .html, but if you wish to track which pages are not being found (though Google Webmaster tools will do this for you as well), all you do is create an normal html page, and then save it as a .php page and add a bit of code into it.
< ?php
$ip = getenv (“REMOTE_ADDR”);
$requri = getenv (“REQUEST_URI”);
$servname = getenv (“SERVER_NAME”);
$combine = $ip . ” tried to load ” . $servname . $requri ;
$httpref = getenv (“HTTP_REFERER”);
$httpagent = getenv (“HTTP_USER_AGENT”);
$today = date(“D M j Y g:i:s a T”);
$message = “$today \n
$combine  \n
User Agent = $httpagent \n
$note \n
$httpref “;
$message2 = “$today \n
$combine \n
User Agent = $httpagent \n
$note \n
$httpref “;
$to = “name@youremail.com”;
$subject = “Email Title of Error Page”;
$from = “From: name@youremail.com\r\n”;
mail($to, $subject, $message2, $from);
echo $message;
?>
As you can see in the code above, it will send you an email when a page is not found (nice to find broken links on your site), and it will tell you the server name, IP address, referer, date it was accessed, page name of error, etc. I have noted that most of my page errors come from bots that have stored previous versions of site pages that have had the names changed, and hackers who are trying to break into directories (more on this next).
Here is an example of the email notice I received when a bot tried to access a page that no longer exists:
208.115.113.83 tried to load www.ecurtisdesigns.com/zencart/index.php?main_page=contact_us
User Agent = Mozilla/5.0 (compatible; Ezooms/1.0; ezooms.bot@gmail.com)
Ok, so now for the .htaccess file, you add “ErrorDocument 404 /404NameOfPage.php” to the file. “404″ is the name of the error handling, so it is a good idea to keep this in the file name for the sake of recognition. The actual code I use for my page is: ErrorDocument 404 /404NotFound.php

3. Selective Access Blocking

Ok, so I noted above that hackers will spend their nights trying to break into your directories. Mine are very secure, but just the same I will block an IP address of one that is seeking to access my configuration files. In this case you simply add the following to the .htaccess file.
order allow,deny
deny from 174.133.99.3
deny from 202.28.37.63
allow from all
As you can see, this is very simple. You have “order allow,deny” followed by the “deny from … with the IP address of the miscreants. Then you finish with “all from all”.

4. Force a Trailing Slash on URL

Some feel that it is best to always have a trailing slash on the primary URL since this encourages the search engines to explore deeper. It may, not sure. If this is important to you, yes, there is an .htaccess code snippet for this:
RewriteCond %{REQUEST_URI} /+[^\.]+$
RewriteRule ^(.+[^/])$ %{REQUEST_URI}/ [R=301,L]

5. Disable Hotlinking
Websites which have a gallery of images will often find their bandwith slowing down as a result of hotlinking. Hotlinking occurs when someone links directly to an image on your site, instead of a remote image on their own local server. The .htaccess code to prevent this is:
RewriteEngine On
#Replace ?mysite\.com/ with your blog url
RewriteCond %{HTTP_REFERER} !^http://(.+\.)?mysite\.com/ [NC]
RewriteCond %{HTTP_REFERER} !^$
#Replace /images/nohotlink.jpg with your “don’t hotlink” image url
RewriteRule .*\.(jpe?g|gif|bmp|png)$ /images/nohotlink.jpg [L]#1 year
<FilesMatch “\.(ico|pdf|flv)$”> Header set Cache-Control “max-age=29030400, public” </FilesMatch>
# 1 WEEK
<FilesMatch “\.(jpg|jpeg|png|gif|swf)$”> Header set Cache-Control “max-age=604800, public” </FilesMatch>
# 2 DAYS
<FilesMatch “\.(xml|txt|css|js)$”> Header set Cache-Control “max-age=172800, proxy-revalidate” </FilesMatch>
# 1 MIN
<FilesMatch “\.(html|htm|php)$”> Header set Cache-Control “max-age=60, private, proxy-revalidate” </FilesMatch>

6. HTACCESS Fast Caching

For websites that have lots of images, video, and flash, it is a good idea to speed up your site’s page load by caching images and other memory intensive files. This code will override one’s own cache settings, … the only potential downside is if you change your content often a visitor may not see your new content until they refresh the page a couple of times though as you can see, the cache time varies by type of file, so it should meet the needs of most.
#1 year
Header set Cache-Control “max-age=29030400, public”
# 1 WEEK
Header set Cache-Control “max-age=604800, public”
# 2 DAYS
Header set Cache-Control “max-age=172800, proxy-revalidate”
# 1 MIN
Header set Cache-Control “max-age=60, private, proxy-revalidate”

7. Stop Spammers on WordPress

For those of you who have blogs, yet don’t use askimet (I don’t since only the non-commercial version is free), here is some code that will help keep the spam to a minimum. What it does is prevent spam bots directly access to your wp-comments-post.php file (used to post comments on your blog). Of course some will simply visit your blog site and manually spam, … yeah!
RewriteEngine On
RewriteCond %{REQUEST_METHOD} POST
RewriteCond %{REQUEST_URI} .wp-comments-post\.php*
RewriteCond %{HTTP_REFERER} !.*yourdomainname.* [OR]
RewriteCond %{HTTP_USER_AGENT} ^$
RewriteRule (.*) ^http://%{REMOTE_ADDR}/$ [R=301,L]

8. Logging PHP Errors

It is a good idea to hide PHP errors from visitors since hackers will often use the errors to perform a process of elimination when trying to access a vulnerability in dynamic php pages. this code will do that.
# display no errors to user
php_flag display_startup_errors off
php_flag display_errors off
php_flag html_errors off
# log to file
php_flag log_errors on
php_value error_log /location/to/php_error.log

9. Wp-config Added Protection

The wp-config file is the WordPress configuration file that links up to the server. As a general rule you will make the file non-writeable through CHMOD settings after installation (and delete the install directory which writes to this file), but it is also a good idea to secure it even more by adding the following code into your .htaccess file.
order allow,deny deny from all

10. Disable Directory Browsing

I often come across websites where the directory is accessible. This allows me to open up every folder, and browse for whatever I want. An easy way to prevent this is to the add the following to your .htaccess file.
# disable directory browsing Options All -Indexes
Well, that’s it for this one, will add more as time allows!
Read more >>

Friday 9 November 2012

Bigrock coupon code to get 25% Off on Domain Registration and Transfer

11 comments

Bigrock Coupon Code

Bigrock is India’s leading domain name, Digital certification, Email Hosting, Web Hosting, Do-it-yourself website, Build-it-for-me website and SEO Compaign provider. They are the very first web hosting and domain name provider in India.

Bigrock Coupon Code
You can use below coupon code during checkout to save 25% on domain name and domain transfer. Hurry. Offer for Unlimited Time. (yes u heard correct this coupon code is valid for lifetime)

Use following coupon code during checkout and save 25% money on every domain name registration and transfer.

patillab.com

This coupon code will help you to get 25% discount on domain registration and transfer. This coupon code is valid for life time and you can register as many as domain names you want using this coupon to get 25% OFF.

Read more >>

Wednesday 31 October 2012

I Am (Rupesh Patil) Back in blogging world

0 comments
Today i am happy to tell you that i am back to the blogging world.... So from todays onwards you will found latest and new tricks for free... After long time i was busy in my newly started company, but my company is well set so i get time to do blogging...

Many 7terabyte's user forced me to come in this blogging world again, so i am back with new junoon....


Thanks and Regards,
Rupesh Patil.
Read more >>

Wednesday 22 August 2012

How To Get Free Recharge

1 comments
Today here is new trick to get free mobile recharges on all mobile network such as Airtel, Aircel, Loop Mobile, Vodafone, Idea, Reliance GSM/CDMA, Virgin MTS, Tata Docomo, BSNL, Dolphin, Trump, Uninor, Videocon and S-TEL. You can also do Special Recharges on Tata Docomo and Videocon Sim card if you want. You can do free recharge on your mobile when your wallet balance is 10Rs. or above.

How To Earn free Recharge?
To earn free recharge you need to send Free SMS through Ultoo. On each SMS that you send you will get paid 2ps. per sms. You can send upto 50sms/day. So you can earn 1rs. daily. And after 10days you get 10rs. Free Instant Mobile Recharge on your mobile.


Register NOW and START Earning Free Mobile Recharges...


Steps To Get Free Mobile Recharge :
  1. Click Above button or CLICK HERE.
  2. Fill all Details.
  3. If asked Referrer Code enter this code : 77947E
  4. Verify Mobile no. and Email ID (To verify mobile no and Email id you will get 1rs.)
That's all you are done. And Start Earning Free Recharges on Your Mobile.

Note : ( if you are not add above referrer code in referrer code field  then you not eligible to get 2rs. instantly as a referrer Registration bonus.)
Read more >>

Wednesday 25 July 2012

How To Get Free Recharge via Sending Free SMS

5 comments
You pay money to recharge your mobile, then don't waste your money to do recharge. Simply click below button and get free recharge via sending free SMS. No one pays you for SMS sent, but here is the new GIANT that pays for every SMS sent.


Ya its true when you Register with ULTOO and thats very Interesting when you EARN Free Recharges. Yes Friends the way is clear now. Just Register using the Below link and Start SMSing for free and earn 2p/sms and it means you are paid for free.

Register NOW and START Earning Free Recharges..................


Note: You have to enter below Referrer Code? (if asked)
If you not enter below Referrer code in referrer box then you are not eligible to get 2rs. instantly for Registration.

Referrer Code : 77947E

After Clicking on the above button Just Register on the SITE and verify your email & Mobile
You get 2rs for Registration (you must have to enter above Referrer code?(if asked) to get 2Rs.) & 1rs for Email Verification
So 3rs is an Instant Bonus !
And For Every Friend you Refer get 1rs Bonus !
Enjoy !
Read more >>

Tuesday 26 June 2012

How to Make a Conference Call using Android phones

4 comments
I had already post article on How to Make a Conference Call with iPhone.
Now here is another article on How to Make a Conference Call using Android phones.

Follow below steps to make conference calls :

  • 1. Call the first person.
  • 2. Once the call is established, press the Menu button.
  • 3. Tap Add call.
Nexus One - Add call option


  • 4. The dialpad appears. Establish a call with the second person.
  • 5. Once the call is established, press Menu.
  • 6. Select Merge calls.
Nexus One - merge calls option


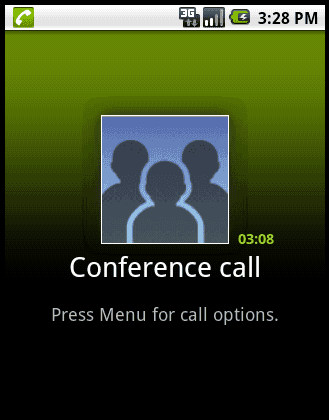
  • 7. Both parties should be on the line now. The Conference call screen will appear.
Nexus One in conference call


  • Repeat steps 2 through 7 to add more people to the call.
That's it....
Don't forget to comment below......
Read more >>

How to Make a Conference Call with iPhone

0 comments


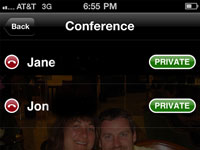
How to Make a Conference Call with iPhone ? What is Conference call ? Conference call will help you to make calls upto 5 friends at same time each of them are speaking and hearing at same time There are more articles about Conference call but i am not discussing it here right now, Here i give you solution about How to Make a Conference Call with Your iPhone. In todays world many businessman people preferred conference calls to attend meetings through phone calls / Conference calls / Video Conference calls. Your iphone also have feature to make conference calls, here is simple tutorial to make conference calls using IPHONE.

Follow below steps to make conference calls :

  • Step 1 : Call one of the people with whom you want to make the conference call.

  • Step 2 : You can manually input the phone number or find the person in your list of contacts.


  • Step 3 : Place that call on hold. 


How you place a call on hold depends on the phone you're using. If you're on an iPhone 4, touch and hold the Mute button. On older devices, just tap Hold.


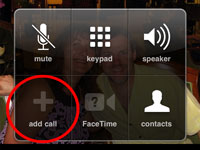
  • Step 4 : Tap Add Call.

  • Step 5 : The keypad will re-apper so you can enter another phone number.


  • Step 6 : Call the next person on the list. 


  • Step 7 : You can enter the number manually or choose from your Contacts list.


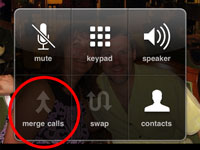
  • Step 8 : Tap Merge Calls so the people you have on the line can chitchat.

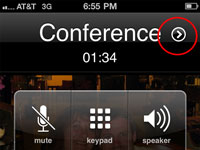
  • Step 9 : At first, the phone number of each caller will scroll at the top of your screen like a rolling ticker. A few seconds later, the ticker is replaced by the word Conference with a circled right-pointing arrow to its immediate right.

  • Step 10 : Repeat Steps 2 to 5 for each additional person whom you want in on the conference call. 


  • Step 11 : You can merge up to five calls at a time.


  • Step 12 : If you want to drop a call from a conference, tap Conference, tap the red circle, and tap End Call.

  • Step 13 : The red circle has a little picture of the phone in it and appears next to the call. 


  • Step 14 : To speak privately with one of the callers in a conference, tap Conference, and then tap Private next to the caller you want to go hush-hush with.

  • Step 15 : Tap Merge Calls to bring the caller back into the conference so that everyone can hear him or her.

That's all your done..... Enjoy Call Conferencing...

Read more >>

Sunday 24 June 2012

7Terabyte's Official Android App

0 comments
Today I feel very glad to announce that 7terabyte.blogspot.com has launched Official Android App. Which is nothing just android app, its more than that it will help you to browse our website without using any browser. It helps our user to access our website at lighting speed. You can share this Android App with your friend using built-in sharing widget. There are several options are included to share our app, some of them are listed below :

  • Bluetooth Sharing
  • Gmail Sharing
  • Via Messaging
  • Share Via Barcode
Google's Android OS now become the No.1 Mobile and Tablet OS in the world, the publicity of Android app goes at lightening speed. The top competitor Apples 70% Top apps are already available in Android market. The android developers are increased day by day and started courses about Android app development.
For that reason we develop our Official App which fulfill your day by day requirements. Here are some Screenshots of 7Terabyte's Official App.

Screenshot 1 :


Screenshot 2 : 


So are you ready to download.? If you are PC users right click on below download image and click on Download File with IDM. Because, PC browsers doesn't support .apk extension. And if you are android user then directly click below image to download app.


 So download and enjoy our newly created 7Terabyte app.

 plz add your review about 7Terabyte app in comment box...

Note : Our app is 100% spyware, malware and virus FREE. But I Highly recommended that check file for viruses before download.
Read more >>

Saturday 23 June 2012

What is Google Adsense Premium Account

2 comments
Google Adsense Premium Account Publisher Program is for premium websites that receive more than 6 million search queries or 10 million page views per month. But in the reality Google might approve websites with much less page view stats which meet Google requirements or policies.

If you not have google adsense account then you can get one that by clicking here Google AdSense revenue sharing sites


How to Get Invitation for Google Adsense Premium Account?

Normally, you can’t apply for Google Adsense Premium Account. This privilege is reserved for those who Google find attractive and worth as a partner. Here are the main factors that Google looks for when inviting new Google Adsense Premium Account.
  • Search Queries/Page views

Google looks for Search queries and Page views of a websites that have a huge amount of traffic. Overall you need to have a millions of monthly page views to get invited.
  • Adsense/AdWords

If you spend a lot of money on Google AdWord program or earn lot of through Google Adsense then there is more chance to get invited by Google for Google Adsense Premium Account.
  • Website Quality

As we know that quality always matters so website contains quality content and followed by Google terms of services can get invited for Google Adsense Premium Account.
Benefits of Google Adsense Premium Account.
  • Creating direct links to Adsense for search results

Google Adsense TOS do not allow publishers to pre-populate Adsense for search box with keywords or create directs links to Adsense for search page.
  • Adsense for Adult Pages/Casino Gambling

Adsense Publishers are not allowed to display Google Ads on that pages contain adult, pornography, mature, casino or gambling content but Google Adsense Premium Account holder are not limited they can use ads on such pages.
  • Advanced Adsense Ads Customization

Google Adsense Premium Account is not limited by the ad formats provided by Google Adsense. They are free to customize the font, sizes and color schemes of their ad units.
  • Customized Revenue Terms


Normal Google Adsense Publishers have fixed revenue percentage and it’s same for all regular Adsense Publishers. But Google Adsense Premium Account can negotiate the share percentage with Google.
  • Optional Google Adsense Ad labeling

Google Adsense Premium Account has the prerogative to remove the “Ads by Google” or “AdChoices”. They are also not required to mark the units as Ads, as opposed to Adsense’s common policy of marking the units are “Sponsored Links” or “Advertisements”. It helps to increase the click through rate (CTR).
  • Dedicated Account Manager

Google Adsense Premium Account is also assigned a dedicated Google representative who helps optimize the look and feel of their Google Ads for better performance.

So keep posting quality articles on your blog or website to get moer traffic and to receive Google Adsense Premium Account invitation.
Read more >>

Google AdSense revenue sharing sites

7 comments
If you want to earn some decent money and you have not any website or blog then don't hesitate you can publish your very own articles on Google AdSense revenue sharing sites to earn money from google adsense. And suppose you have website but not approved by google adsense then don't get tense you can get approved by Google AdSense revenue sharing sites.

List of Google AdSense revenue sharing sites


Here are some of the List of Google AdSense revenue sharing sites :

  • Passiveknowledge: Passive Knowledge is adsense revenue sharing sites that share 75% of the adsense income.
  • Hubpages: HubPages is your online space to share your advice, reviews, useful tips, opinions and insights with hundreds of other authors. HubPages is completely free
  • Xomba: Xomba is a writing community where you can post your own original content, network with other writers and get paid to write.
  • Senserely: Senserely is an Adsense Revenue Sharing Community, our members are all AdSense Publishers and write in their blogs original content so that everybody profit
  • Squidoo: The popular (free) site for creating single webpages on your interests and recommendations. Even earn money for charity or yourself.
  • Shoutmeloud: ShoutMeLoud offer adsense revenue sharing for Guest bloggers.
  • Expertscolumn: Expertscolumn is a community where authors get paid to write columns (articles). Authors that we usually refer to as columnists simply
  • Devilsworkshop: Devils’ Workshop is a blog about internet, technology, blogging, SEO, wordpress, social networking news, tips & tutorial.
  • Simpy: Simpy brings you the latest news from around the world, covering breaking news in business, politics, entertainment, technology, and more.
If you like this post then plz add comment below, then i will post sites that shares 100% adsense revenue.
Read more >>

Thursday 21 June 2012

How To Zoom Photos On Facebook

0 comments
How To Zoom Photos On Facebook..??
My many friends ask me that how to zoom facebook photo, so guys here is solution...
Facebook is the one of the popular social networking website in the world.
The Facebook posses many videos,photos, games and different applications.
Most of the people on the internet does have Facebook account as it is a popular social networking website. In facebook people upload images, videos and etc., Facebook helps you to organize the photos in to albums to share with your friends. In Facebook we can view the image but we cannot zoom the images to overcome the image problem there is a Google Chrome Extension naming FB Photo Zoom.


This extension helps you to zoom the photos in Chrome, by using this you can view the photos of other profiles with out clicking on it.

Download FB Photo Zoom
Read more >>

How To Hide Annoying Friends On Facebook

0 comments
How To Hide Annoying Friends On Facebook
Most of the people annoy me on Facebook, when the important work is going on. I cannot un friend a friend on Facebook and i cannot concentrate on my work too. Then i found a way to hide annoying people on Facebook.
There are different ways to hide annoying people on Facebook.

1. Go Offline To A Person Who Annoy


2. Hiding From Specific Annoying People

Go to Chat -> Advanced Settings

Now in a search box name your friends who annoy you.


3. Hiding All Others And Appearing Online To Certain People

In Advanced Settings -> Click on “Only some friends see you” and name your friend name.


Click on Save.
Thats all...
Read more >>

Export Email Addresses of your Facebook Contacts to Yahoo mail

0 comments
Now its time to Export Email Addresses of your Facebook Contacts to Yahoo mail. A simple steps which can help you to export Facebook contacts to your Yahoo mail. It is good way to store your Facebook friends contacts to your Yahoo mail, using these emails you can keep in touch with your friends even when they are not on facebook, it can also used to export contacts from Gmail, Windows Live/Hotmail, or from Others email providers to Yahoo mail, so follow following simple steps to Export Email Addresses of your Facebook Contacts to Yahoo mail.


Step 1 : Go to address.yahoo.com and click the Facebook icon


Step 2 : Click on Allow


Step 3 : Click on Continue

Step 4 : Click on the Facebook icon.


Step 5 : Authorize Yahoo in the Facebook pop up and then wait a few seconds. You’ll see a confirmation screen like this


Ok, you’ve now imported the names and email addresses of all your Facebook friends into Yahoo. Now just click “tools” in Yahoo mail and export. CSV format is a good format for uploading to Gmail or your desktop contact book. Save the file to your desktop, and you’re done.


Like this post then plz add comments below...
Read more >>

Trick To Hide Your Email From Facebook Apps

0 comments
In this post i m going to tell you something interesting about How/Trick To Hide Your Email From Facebook Apps.

Social Networking sites are day by day becoming popular as they come with different features, extensions and apps. If there are more apps on Social Networking sites, then that site is popular. The same thing goes well with Facebook too.
Millions of Facebook users interact with their friends through apps of Facebook by exposing their Email Address, as they are vulnerable to various security threats.
Unfortunately, these features of Facebook Apps are being used my millions of users, but it has also opened up for the opportunities for the hackers. Most of the Apps in Facebook asks for the email address when you open the Application, it poses high threat to the users.


CastleVille is the one of the popular game on Facebook. The user needs to visit the Application page on Facebook and click the CastleVille application. A window will appear immediately where the game developers will seek permission to access the basic information of the user like name, email address and other. Most of the users click “Allow”, which may not be a wise thing to do.
But, you can enjoy CastlevVlle game without exposing your Email ID. All you have to do is to click the “Change” option provided beside the “Send me email” and you will be offered options either to enter your authentic Email ID or any proxy Email ID that will be reported to the game developers by Facebook. The game developers will send emails to that proxy email ID, which will be redirected to your main inbox.
Read more >>

Wednesday 20 June 2012

Keyboard Shortcut to Hibernate, Shutdown, Restart and Sleep mode

0 comments
Here is another Keyboard Tricks for you, I didn't shut down my laptop when i am done at office. I hibernate my laptop so that i can open my laptop at home and start working where i left my work or next day start the work from same place where i left. In Windows XP to hibernate you have to do Start - > Shut Down and then select Hibernate from drop down.
But, sometimes we need to shutdown and some times to restart. In my previous article i post Keyboard Shortcuts For Facebook and Usefull Windows keyboard Shortcuts. So now here is Keyboard Shortcut to Hibernate, Shutdown, Restart and Going To Sleep mode

Actually, before I do that, I'd better explain the Windows Key (referred to later in this tip as WIN). Look at the bottom row of your keyboard. See that key with the Windows logo between CTRL and ALT? That's the WIN key.

So, here are the XP shortcuts:

  • Shutdown: WIN, U, U
  • Reboot: WIN, U, R
  • Stand by: WIN, U, S
  • Hibernate: WIN, U, H

Okay, I'm done with the digressions. Now on to the original question: What are Vista's equivalents?

As with XP, this is really about manipulating the Start menu with the keyboard. You press the Windows key to bring up the menu. But thanks to Vista's search box, pressing an alphanumeric key won't help here. You need to use arrow keys--at least at first.

Going into Sleep mode is pretty easy:

Press WIN, the RIGHT ARROW, then ENTER.

All the other options require you to press WIN, then press the RIGHT ARROW three times. What you press next depends on what you want to do:

Shutdown: ENTER, or U

Reboot: R

Hibernate: H

By the way, once you've pressed WIN, you can use the arrow keys to navigate all over the Start menu. Give it a try.

Here's another option you might like: commands. Press WIN, then type:

Shutdown: shutdown -s t 0 (note the blank spaces before -, t, and 0)
Reboot: shutdown -r t 0
Hibernate: shutdown -h
Then press ENTER.

If you like this trick plz post comment below...
Read more >>
 

Total Pageviews

Translate

7TeraByte © 2012. All Rights Reserved | DMCA Protected | Back To Top